Inspired Edibles

~ wellness, wonder, words ~

  • Home
  • Welcome ❥
  • Inspire
  • life
  • Index
  • Contact
  • Privacy Policy

Oatmeal Buttermilk Breakfast Scones with Cranberry and Pistachio

December 18, 2013 By kelly / inspired edibles 19 Comments

Oatmeal Buttermilk Scones with Cranberry_insert (3)

Home is where you make it

~~~~~~~

I started making these breakfast scones shortly after our sons were born.

I wanted to begin Christmas morning on a memorable note and create a tradition that we could all look forward to year after year.

Since then, we’ve added bits and pieces to our culinary repertoire, some have dropped off and some have endured, including these little rustic country-style biscuits that stand out in my mind as one of our first celebratory rituals. I can still picture our boys in their younger years licking their lips with jam covered cheeks.

I remember their footsteps on those cold Christmas mornings, the thunder of tiny feet rushing along the old wood floors to climb into bed with mom and dad. The sun not yet up, the streets lit with snow.  A series of frenzied hugs full of giggles and jumps, arms flung, legs tangled, one more snuggle underneath the warmth sheets. One more chance to hold the fleeting moment.

The one (and only) time I ever made pajamas…
for my boys at Christmas time
my youngest is visibly impressed with his bell-bottom version ;-)

It’s hard to believe these little tigers are now burgeoning young men. One almost 16 (I have no idea how that happened) and the other, 13.

It will be a different Christmas for us this year; we are a long way from where we started but that is not to say that we are not home.

We will carry our families in our hearts and celebrate our traditions with the same spirit and gratefulness as always.

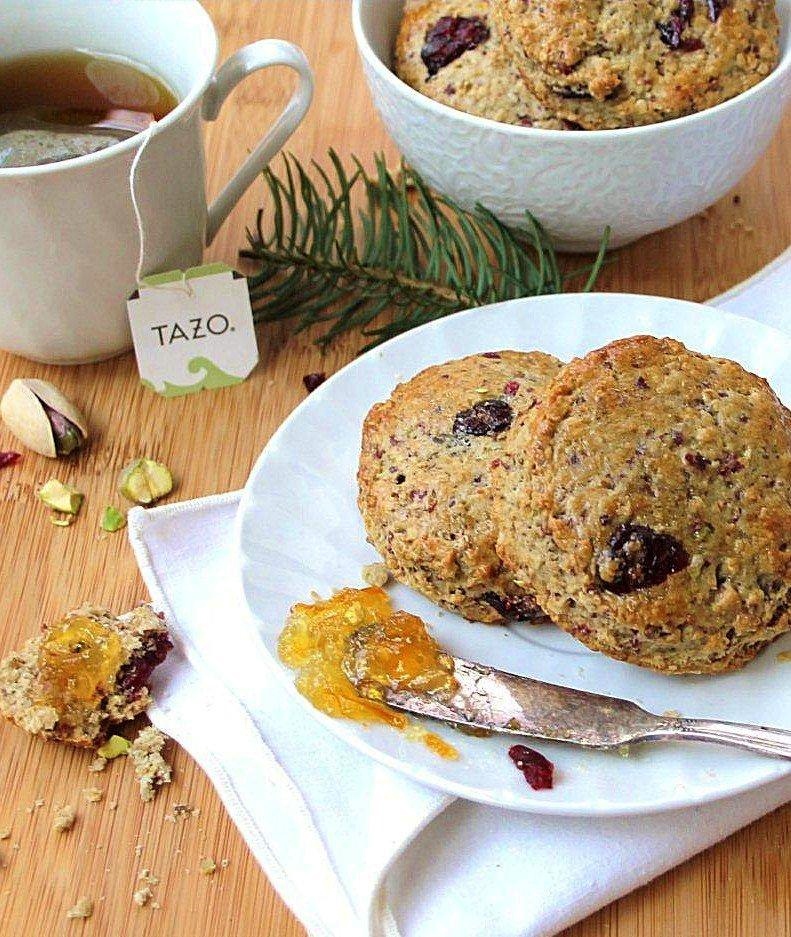
Today I’m sharing a little piece of that tradition with you. Since everyone has a different idea of what a scone or biscuit is, (I can just hear my British friend Charles chiming in now), I will describe these scones as very subtly sweet, relatively dense and coarsely textured owing largely to the oatmeal. They are full-bodied and complex. If you are looking for a high-rise, light, airy, fluffy and puffy biscuit, these are not your morning glory.

Some of our favorite toppings include sharp cheese and hot pepper jelly as well as ricotta and various types of jam.  These scones are also delicious any other time of day, of course, but we especially delight in them in the morning to kick-off our holiday festivities.

I hope you will enjoy these scones if you give them a try sometime along with your own favourite holiday traditions.

Be sure to read the Nutrition and Cooking Notes for best results and, to my family, friends and supporters in Canada, please keep those beautiful snow-covered pictures coming!

Oatmeal Buttermilk Breakfast Scones with Cranberry and Pistachio

Oatmeal Buttermilk Breakfast Scones with Cranberry and Pistachio

  • 1 + 3/4 cups (420 mL) spelt flour (or flour of choice)
  • 2 cups (500 mL) 100% pure rolled oats
  • 4 Tbsp (60 mL) demerara sugar, substitute brown sugar
  • 2 + 1/2 tsp (12.5 mL) baking powder
  • 1/2 tsp (2.5 mL) baking soda
  • 12 Tbsp (3/4 cup/170 grams) chilled coconut oil or old fashioned butter, cut into piece
  • 1/2 cup (125 mL) buttermilk + a touch for brushing tops of scones
  • 1 large egg
  • 1 Tbsp (15 mL) orange zest
  • 2 tsp (10 mL) vanilla extract
  • 1/2 cup (125 mL) dried cranberries + handful for decorating top of dough
  • 1/3 cup (80 mL) pistachios, shelled and chopped + another pinch for decorating top of dough

Makes about 16-18 biscuits

Nutrition and Cooking Notes:

  1. You can experiment with different flours of choice here to accompany the oats including gluten free grains.
  2. Make Ahead Option: I generally freeze the scones (cut into shape but unbaked) in an airtight container or ziploc bag a week or two before Christmas.  Simply defrost in fridge overnight and bake in the morning.  The scones are best eaten shortly after they are baked (and the same day).
  3. If you are accustomed to a sweeter scone, I recommend sprinkling the tops of the scones with a dusting of sugar before baking — you will get more taste this way without driving up the sugar level significantly (same applies to salting at the end of cooking rather than the whole way through a recipe).
  4. I cannot emphasize enough how different oven temperatures will create different cooking times for these scones.  My former gas stove at home would easily tolerate 400 F for 18-20 minutes for these scones.  That temperature in the oven I’m using here fried my biscuits on the first run through :(.  I had to go with 375 F,  position the rack in the middle of the oven and the biscuits were done in about 10-12 minutes.  If you know your oven to be hotter than the average, please be aware of this.
  5. I added the bulk of the cranberry and pistachio to the food processor (rather than mixing them in following) as an experiment and it created a great effect — the dough was speckled with little bits of cranberry which I thought was both visually appealing and festive. I then added just a few larger pieces of cranberry and pistachio to the top of the dough surface (since we also like chunky pieces).  If you prefer to keep everything chunky, simply add the cranberry and pistachio following the processor part (described below).


Directions:

  1. Preheat oven to 375 F.
  2. Combine the first 5 ingredients in a blender/food processor and pulse until combined. 
  3. Add 1/2 cup cranberries, 1/3 cup pistachio and the coconut oil or butter and pulse until coarse meal forms. Transfer to a large bowl. (Note: the blender/food processor will grind your fruit/nuts into tiny bits. If you prefer to keep your cranberries/pistachios larger sized, simply add to ‘dry’ ingredient bowl following the processing part).
  4. In a separate smaller bowl, combine: buttermilk, egg, orange zest and vanilla, whisking to combine.
  5. Add wet ingredients to ‘dry’ ingredients and mix with a fork just until dough forms — do not overmix. If the dough is too wet or too dry simply add a small amount of flour/oatmeal or buttermilk as required (it’s helpful to have some extra flour/oatmeal as well as buttermilk beside you in case you need to make adjustments).
  6. Turn the dough out onto a lightly floured surface and knead four or five times. Spread and pat the dough out into a 3/4-inch thick (approximate) round. 
  7. Cut out as many scones as possible using a 2 + 1/4-inch (or so) cookie cutter (a small glass or inverted wine glass will work just fine). 
  8. Gather scraps, reshape, and cut out more scones. 
  9. Transfer scones to a gently floured baking sheet/s and brush tops with buttermilk and sprinkle of sugar, if desired.
  10. Bake scones until just golden, about 12-18 minutes, in the middle of the oven  (watch carefully as oven temperatures will vary – see notes above).
  11. Allow scones to cool slightly before relishing! 
© Inspired Edibles


Oatmeal Buttermilk Scones with Cranberry_insert (3)

Filed Under: Breads Muffins and Loaves, Breakfast, Snacks and Dessert

Crispy Dark Chocolate Bark with Ginger & Pomegranate

December 4, 2013 By kelly / inspired edibles 38 Comments


Blessed is the season which engages the whole world 

in a conspiracy of love ♥ 


                                                                                      ~ Hamilton Wright Mabie

~~~~~~~

I’m not sure what happened to November.

Last I checked, it was November 7th.  Four trips across the continent later and we seem to have leapfrogged into December.

So here we stand in the season of hope, wonder and possibility. The season of miracles. And I could not be more welcoming.

For family and friends who are praying for the well-being of loved ones, my wish is that this season brings a sense of comfort and renewed hope. Let’s stay united in a conspiracy of love.

I look forward to sharing a few holiday treats with you over the coming days and may even sneak in another pomegranate recipe before we’re all done — (have to take advantage of the short season!).

I’m kicking things off with a variation on Christmas bark that was inspired by a recent discovery I made at Trader Joe’s: Dark Chocolate Crisps.  More specifically “thin curved waves of Belgian dark chocolate with crispy bits…”   Utterly addictive!

I typically incorporate some combination of fruit, nuts and seeds in my Christmas bark but decided to go with the crispy crunch effect this year (thank you Joe) and I’m glad I did. It worked out very well and introduced a whole new taste and texture sensation to the bark.

If you like ginger, you are going to love it here! It adds just the right amount of heat and zing to the chocolate and contrasts nicely with the juicy and mildly tart pomegranate.

Be sure to read the Nutrition and Cooking notes for best results.

Crispy Dark Chocolate Bark with Ginger & Pomegranate

Crispy Dark Chocolate Bark with Ginger & Pomegranate

  • 10 ounces (300 grams) dark chocolate (70% cacao or more), broken into pieces
  • 1 cup (250 mL) fresh pomegranate arils (seeds), 1 large pomegranate should do (or simply buy the seeds if available)
  • 1 cup (250 mL) rice puffs (or any puffed or flaked cereal/grain of choice)*
  • 2 heaping Tbsp (30 mL plus) finely chopped candied ginger (about 4 pieces)
  • Sprinkle of coarse sea salt, optional

Makes approximately 10 (80 grams) servings

Nutrition & Cooking Notes:

  1. *I used rice puffs (no sugar added) for this bark but you could use any puffed or flaked cereal grain of choice here (rice, quinoa, buckwheat, kamut, barley, corn, etc) — the trick is to make sure you select something that is crispy.  Millet puffs, for example, are typically soft and would not work very well here.
  2. I also made this recipe with a flaked rice from Kashi and found it equally yummy.  The shape of the cereal grain you choose will change the look of the bark slightly (bumpy/ridgy, round or oblong) but as long as it’s crispy, you’ll get the desired crunch effect.
  3. To benefit from the antioxidant power of dark chocolate aim for 70% cocoa or more.  I typically use 75%. If you are new to dark chocolate, start slowly and work your way up.
  4. The quality of the pomegranate seeds really makes a difference — the first batch I bought was a little lackluster, monochromatic and not very juicy.  The second batch tasted like something all together different.  Plump, full of juice and very tasty. Buying the arils (seeds) alone will allow you to assess how healthy and vibrant they appear (look for brighter coloured ones).
  5. The ginger really adds to this recipe so unless it’s not your thing, I highly recommend it.
  6. Although I didn’t use it in this recipe, a sprinkle of coarse sea salt might also be fun if you like the combination of sweet/salt.

Directions:

  1. Line a baking sheet with wax or parchment paper.
  2. Place the chocolate in a sturdy pot set to the lowest temperature on the stove.  Watch the chocolate carefully as it melts (stirring to assist) and ensuring that it does not come into contact with water.
  3. Once the chocolate has fully melted, remove from heat and add the finely chopped ginger followed by the puffed cereal, mixing to combine.
  4. Spread the chocolate mixture out onto the prepared baking sheet in a rectangular shape (or something like that).
  5. Sprinkle the surface of the chocolate mixture with the pomegranate seeds, gently pressing them into the chocolate.
  6. Place the bark in the refrigerator to set for approximately 30-60 minutes.
  7. You can break the bark into chunks with your hands (being careful not to crush the seeds) or use a knife if preferred (if the bark is not fully set, the chocolate will begin to melt in your hands).
  8. Store the bark in a sealed container in the fridge or freeze (my preference).  The bark should last for up to five days in the fridge however the pomegranate seeds might start to sweat before that time.
© Inspired Edibles


makes a lovely gift!
~~~~~
I also want to invite you to follow my Christmas boards on Pinterest!
simple, affordable & elegant holiday decorating ideas and DIY projects
cookies and other yummies too!
 
~~ Enjoy ~~

Filed Under: Festive, Snacks and Dessert

Pomegranate Kefir Mousse (No-Bake, Egg-free)

November 8, 2013 By kelly / inspired edibles 11 Comments

Stella and I walk past a blooming pomegranate tree every morning.

We stop to admire the new fruit, the crown shaped tips and crimson tones.  The changes are slight but notable day by day. We’ve not yet met the owners but we keep a look out. I can’t help but wonder whether they’ll harvest the burgeoning fruit that appears to be hitting it’s prime.  If I discover these jewels rolling on the ground one day (and eventually rotting) I’m coming back with a big bag!

I’m still in a state of awe and wonder over the diversity of growth and staggering beauty that surrounds us here in northern California.

When we first arrived we were overcome by the citrus fruit – first lemons, then limes and finally a bounty of oranges.  I thought I had seen it all. Now we are being treated to persimmons and pomegranates.  Incredible.  It reminds me of my husband’s observation the first week we arrived: “it’s as though every plant in the universe wants to grow here” — that pretty much sums it up.

Most pomegranates available in stores in North America are grown in California. They have a short but delightful season that spans from late September through November and with good storage techniques, the fruit can be available into January some years.

Beyond the fruit’s striking beauty and mildly tart and delicious taste, pomegranate juice contains potent antioxidants that have been the subject of numerous promising cancer studies over the years. Pomegranate also supplies good amounts of potassium, vitamin C and fibre.   


Today, I’m celebrating this regal fruit with a light and luscious dessert that also happens to be replete with probiotic cultures and protein thanks to its *Kefir cheese base (see Nutrition Notes below for more information on Kefir).


Though it doesn’t contain eggs or cream (nor large whipped air bubbles) I am nevertheless calling this little delight a mousse because its texture best resembles that of mousse. It has a mildly tart/tangy taste and gentle sweetness (not overwhelming) along with a soft and silky consistency — (melt.in.your.mouth.goodness). If I wasn’t such a devout chocolate fan, I might be compelled to say that this was my new favourite mousse. (Let’s just say it’s my new favourite non-chocolate mousse).  

Perfect for guests served up in fancy glass or stemware with a dollop of cream if you like or as a week night treat in everyday bowls.  It’s all about refrigeration time.  The mousse itself will take you about 10 minutes to prepare.  The longer it sits in the fridge, the firmer it will get though; best eaten on day one to avoid rubberization (I’m pretty sure that’s a word).

Pomegranate Kefir Mousse (No-Bake, Egg-free)
 
Print
A light and luscious no-bake mousse reminiscent of cheese cake made with probiotic rich kefir yogurt and pomegranate
Author: Kelly
Serves: Serves 4
Ingredients
  • 2 cups of pure pomegranate juice
  • 1 Tbsp gelatin powder
  • ¼ cup pure maple syrup
  • 2 cups Kefir cheese (or other soft quality cheese or yogurt such as quark, ricotta or Greek yogurt)
  • 1 tsp vanilla extract
  • ½ cup or so pomegranate seeds (arils)
Instructions
  1. In a large bowl, place ¼ cup pomegranate juice and add the gelatin powder. Allow the mixture to sit and hydrate (or "bloom"). It will become temporarily hard.
  2. Meanwhile, bring the remaining pomegranate juice and maple syrup to a gentle boil on the stove top. Remove the mixture from heat and carefully add it to the gelatin mixture whisking until the gelatin is fully dissolved.
  3. Add vanilla and kefir cheese to the warm pomegranate mixture, whisking to combine all ingredients until the kefir cheese is integrated and smooth. The pomegranate cheesecake mixture will take on a beautiful antique rose hue.
  4. Pour the cheesecake mixture into individual glasses or bowls and refrigerate until firm (about 3-4 hours).
  5. Before serving, sprinkle the cheesecakes with pomegranate seeds -- enjoy!
Notes
Kefir is simply a fermented milk product (much like yogurt) that is rich in protein, calcium, B vitamins and potassium. It is often sold as a beverage and typically has a thinner consistency than yogurt. The big difference between Kefir and yogurt is in the number of active cultures they contain. Kefir typically contains 3 times the amount of probiotic cultures (friendly bacteria) as yogurt. Probiotic cultures help inhibit the growth of unfriendly, disease-causing bacteria while stimulating digestion and the body's immune system.
Kefir cheese is a soft and smooth cheese - easily spreadable - made from the Kefir milk product. It has a much higher quality nutrition profile than other soft cheeses, notably cream cheese, and it tastes better too! (I've always found cream cheese a bit on the plastic side taste wise - overly processed). I'd like to try making my own Kefir cheese some day.
Those who are lactose intolerant may find it easier to tolerate Kefir beverage, Kefir cheese and yogurt because the live cultures used to make them break down the milk sugar (pre-digesting the sugar for you!).
3.5.3251

pomegranate-tree[1]

the beautiful pomegranate tree we admire on our daily walks – love the benches!

the mousse has an antique rose colour – so pretty!

pomegranate-tree_blog-4[1]

crowning beauty

Filed Under: Snacks and Dessert

Cinnamon Spice Breakfast Oat Cakes

October 16, 2013 By kelly / inspired edibles 25 Comments

cinnamon spice oat cakes_blog

I’m so excited to share this recipe with you today!

If you like oatmeal cereal for breakfast (and quite possibly even if you don’t) you will fall in love with these all natural oat cakes — simple and portable oatmeal biscuits that contain all the goodness of oatmeal cereal served up in a whole new way!

When I came across this post on Scottish oatcakes, I was immediately taken by the simplicity and wholesomeness of these lovely oat biscuits.  Charles, the author of the post, will take you through the Scottish version and history of oatcakes and I couldn’t agree with him more that “more people need to try these wonderful little things.” So today I’m spreading the love with my interpretation of Charles’ delightful recipe.  (And, for bonus marks, if someone can explain to me how Charles got 24 oat cakes from 1 cup of oats, please write to me!).

Some of you may be familiar with the puffy rice cakes made by Quaker.  The ones that taste a bit like air. Quaker rice cakes were very popular when my boys were growing up as a less-sugary snack option for toddlers (and moms alike). I find oat cakes, which I’ve not come across before, more interesting both nutritionally and texturally.

The texture of the featured oat cakes is not entirely crispy like a cracker.  I would say it is more reminiscent of a biscuit – somewhat chewy but also slightly crunchy.  Subtly sweet and full of fall aroma (smells so good baking).  The next time I make this breakfast version, I’m going to toss in some plump raisins or slivered dried cranberry or apricot. Chopped up apple might also be fun to experiment with.  It also occurs to me that there are endless possibilities on the savory side — rosemary, cumin, Parmesan, cayenne pepper… oh my, the places you’ll go! (the Scots are cringing right now as I bastardize their classic).

Something else too.  Although I don’t encourage the overuse of protein powder, (it’s not food and can cause digestive distress when taken in frequent/large quantities), adding it to the mix would turn these wafers into a super post-workout option (since they travel well, you could pop them right into your sports bag).  They would also be great for those early morning car or bus rides when there just isn’t time for an at-home breakfast.

Triple the batch and store them in an air-tight container all set to go. Warm them up before enjoying (savor the incredible aroma they release) or simply eat them at room temperature.

Cinnamon Spice Breakfast Oat Cakes

Cinnamon Spice Breakfast Oat Cakes (Gluten Free, Vegan) ~ modified from FiveEuroFood

  • 1 generous cup (250 mL) 100% whole grain pure uncontaminated oats***
  • 1/2 tsp (2.5 mL) cinnamon
  • 1/8 tsp (1.25 mL) nutmeg
  • 1/8 tsp (1.25 mL) allspice (or pinch of clove)
  • 1 + 1/2 Tbsp coconut oil (22 mL), melted (or melted butter if preferred for a non-vegan version)
  • 1 tsp (5 mL)  pure maple syrup
  • slightly less than 1/2 cup (100 mL) hot water


Makes approximately 8 oat cakes but you can easily double or triple the batch!

Notes:

  1. ***Pure oatmeal does not contain gluten however many commercially sold oats do due to cross-contamination issues. If you are gluten sensitive or have celiac disease, be sure to seek out certified ‘gluten-free’ oatmeal.
  2. I am a very clumsy baker and dough maker.  Kneading and rolling dough are more often exercises in frustration from my pov but this recipe is SO simple, you cannot go wrong!! That’s one of the things I love most about it (that and the fact that these delightful oat cakes smell like warm apple pie when baking… heavenly).  A perfect project with youngsters too!
  3. The oat cakes themselves are fairly subdued in taste – the flavor really comes from the additions – herbs/spices and toppings. Providing the dry/wet ratio is generally respected you can work with a sweet or savory version of your choice drawing from your favorite herbs and spices. The sky is the limit in terms of variations on this recipe.  My son and I have plans to make a rosemary, sea salt version together tomorrow afternoon.
  4. You can enjoy these cakes on their own or with any number of toppings: nut or seed butter, yogurt, ricotta or cottage cheese, sharp cheddar with a spicy red pepper jelly, goat cheese, as you wish.

cinnamon spice oat cakes_blog

Directions:

Heat oven to 375 F.
  1. Place oats in a roomy bowl and add cinnamon, nutmeg and allspice, stirring to combine.
  2. Add melted coconut oil or butter to oats followed by maple syrup, stirring to combine.
  3. Add hot water to oat mixture, allow it to sit for about 5 minutes and then blend with your hands and form into a ball-like shape.  If the mixture is too wet, add more oats incrementally and do the same with water if the mixture is too dry.
  4. Lay a piece of parchment on a spacious counter surface or table and dust with gluten-free flour (I used quinoa).  Place oat bundle in the center.  Dust the oat bundle with a little bit more gluten-free flour.  Place a second piece of parchment paper over the ball and gently press down on the ball with your palms.
  5. Using a rolling pin (or, any other weighted bottle) roll the dough out until quite thin, about 1/10 of an inch (3mm).
  6. Using a round cookie cutter (I used an inverted wine glass) cut the dough into discs, making as many oat cakes as you can.
  7. Meanwhile, line a baking sheet with parchment paper and transfer the oat cakes on the ungreased sheet.
  8. Place the sheet in the oven and bake the oat cakes on one side for approximately 7 minutes or until the oat cakes feel somewhat resistant (firm to the touch).  Flip the oat cakes over and bake for another 7 minutes or until firm. The color of the oat cakes should not change very much.
  9. Remove the oat cakes from the oven and allow them to cool for a moment before enjoying on their own or with any number of toppings (see suggestions above in Notes section).  Meanwhile, enjoy the smell of apple pie wafting through your kitchen as they bake ;-).
© Inspired Edibles


 cinnamon spice oat cakes_blog
I especially enjoy these little oat cakes with yogurt

my husband’s favorite topping is orange marmalade which is also super yummy!

Filed Under: Breakfast, Snacks and Dessert

Roasted Brussels Sprouts Chips with Balsamic

October 9, 2013 By kelly / inspired edibles 17 Comments

brussels sprouts chips_blog
We’ve been living on the West coast now for about two months and I think it might be time for me to switch the clocks to pacific time.

I haven’t worn a watch in years but my cell phone, computer and bedside clock are all set to eastern standard time.  A little sad I know.  Kind of like a last holdout thing.  There’s sentimentality involved and then there’s the somewhat embarrassing yet inescapable fact that I can’t stand being 3 hours behind the rest of the continent (there, I said it). Even when I’m up at 6 am, bright-eyed and bushy-tailed, I seem to have missed the morning boat. Hopefully I will chill into the Western ways over time (you know, that balance and clarity thing).

In the meantime, have I got a beaut for you!

I just recently read that Brussels sprouts are America’s most hated vegetable. I had no idea. I’m not sure I was ever exposed to Brussels sprouts in my youth (our vegetable rotation generally consisted of corn and peas) but I will admit that these tightly wound greens are rather odoriferous and, depending on how they’re cooked, may well be the object of childhood trauma.

But therein lies the rub. It turns out that it’s quite easy to unleash the Brussels spouts inner goddess by simply roasting them. Nothing more, nothing less. I’ve personally had a small obsession with these cruciferous veggies since discovering this wickedly effective technique and I bet you will too.

In addition to roasting the full bundles, the leaves cook up into delicious crisps that merit attention in their own right.

Today, I’m featuring these little chips which are perfect as a cocktail nibble, game day munchy or snack any time of day.

Are you ready to transform your Brussels sprouts experience?

I thought so.

Roasted Brussels Sprouts Chips

Roasted Brussels Sprouts Chips 

  • 14 or so Brussels sprouts
  • 2 tsp (10 mL) olive oil
  • 1 tsp (5 mL) lemon zest, optional
  • sea salt
  • 1/4 cup (62.5 mL) balsamic vinegar for dipping


Makes about 2 cups of brussels sprouts chips

Cooking and Nutrition Notes:

  1. My favorite combination for these chips is simply olive oil and salt.  The lemon does add a nice variation however and if you are a balsamic lover, the dunk option is delicious too.
  2. In addition to their delicious roasted taste, Brussels sprouts are chock-full of nutrients including vitamin K, manganese, folate, fibre and vitamin C.  In fact, gram for gram, Brussels sprouts contain nearly fifty percent more vitamin C than an orange! Along with other cruciferous vegetables, including cauliflower and broccoli, Burssels sprouts are also known for their exceptional concentration of cancer-fighting compounds.

Directions:

Heat oven to 375 F.
  1. After washing the Brussels sprouts, cut off the very bottom of each one and then cut the remaining portion of the Brussels sprout in half (this should facilitate removal of leaves somewhat).
  2. The first few exterior leaves should fall off easily.  Trim the bottom again to remove more leaves until you can no longer get the leaves off the tight interior bundle.
  3. Place the leaves and the tight interior bundles (I roast those too!) in a roomy bowl.  Add olive oil and sea salt as well as lemon zest if using.  Using your hands, gently massage the oil mixture into the leaves.
  4. Place leaves on a parchment or foil lined baking sheet (or two sheets) spreading them out as much as possible (they will not crisp properly if overcrowded).
  5. Bake the leaves for 6-8 minutes or until they begin to brown.
  6. Allow the Brussels sprouts chips to cool for a moment and then transfer to a serving dish to enjoy right away!  They are best right out of the oven.
© Inspired Edibles


look at the size of this beast!
(i could barely fit it into my preview)
this gorgeous Brussels sprouts stalk is grown right here in California ;-)

ready for the oven


these leaves were cooked at a slightly higher temperature (400 F) for extra crispiness
in the end, I found the moderately crisp ones just as tasty and less likely to burn

brussels sprouts chips_blog

Filed Under: Appetizers and Starters, Snacks and Dessert

Ginger Infused Chocolate Chip Pumpkin Squares (Grain Free, Dairy Free)

October 2, 2013 By kelly / inspired edibles 17 Comments

pumkin squares
We may be living a different type of fall here in California than the kind that I’m accustomed to at home but that’s not going to stop me from getting up to my elbows in orange!

Over the past couple of weeks we’ve been baking oatmeal pumpkin breakfast cookies (so yummy), savoring squash soups and experimenting with different versions of these chocolate chip pumpkin squares. We are definitely on some kind of pumpkin roll.  Now all I need is a copy of Charlie Brown’s It’s the Great Pumpkin and all will be complete.

The squares that I’m featuring today are very reminiscent of pumpkin pie.  If you’re not a fan of the taste or texture of pumpkin pie, these are not your squares.  On the other hand, if you enjoy pumpkin pie, you will find the taste of these squares remarkably similar with an accent on the fresh ginger.  The texture of the squares is slightly firmer than pumpkin pie which allows them to be hand held but you get the same soft, melt-in-your-mouth quality minus the copious amounts of sugar, cream and groovy condensed milk.  You can skip the chocolate if you wish and mix in any nut, seed or dried fruit instead.

If you’re sulfite sensitive, you may wish to use your own blend of spices to avoid the preservative that is commonly found in commercial “pumpkin pie” spice. Pumpkin pie spice is generally made up of a combination of ground cinnamon, nutmeg, ginger and allspice but cinnamon/nutmeg will get you mostly there.

Ginger Infused Chocolate Chip Pumpkin Squares

Chocolate Chip Pumpkin Squares (Grain Free, Dairy Free) ~ Inspired by Elana’s Pantry

  • 1/2 cup (125 mL) almond flour
  • 1 Tbsp (15 mL) tapioca flour (also known as tapioca starch)
  • 1 tsp (5 mL) baking powder
  • 2 tsp (10 mL) ground cinnamon
  • 1/4 tsp (2 mL) ground nutmeg
  • Pinch sea salt
  • 1/2 cup (125 mL) dairy free dark chocolate chips (substitute nuts or dried fruit if preferred)
  • 2 eggs
  • 1/4 cup (62.5 mL) melted coconut oil
  • 1 cup (250 mL) pumpkin purée
  • 1 Tbsp (15 mL) fresh grated ginger, optional
  • 1 tsp (5 mL) vanilla
  • 1 banana broken into pieces
  • 3 Tbsp (45 mL) pure maple syrup


Makes 16 Squares

Notes:

  1. The fresh ginger comes through distinctly and, in my view, beautifully but if fresh ginger is not your thing, simply omit.
  2. You can use any combination of nuts, seeds or dried sliced fruit in place of the chocolate if you wish.  One of my favorite combinations is salted macadamia with pumpkin.
  3. You can try cornstarch in place of tapioca (I have not attempted the experiment) but if you omit the starch altogether, you may find that the squares are spongier/wetter and flatter — still tasty but not the same texture.
  4. The taste of the banana in this recipe is undetectable — it is used as a natural (and nutrient rich) source of sugar as well as a bulking agent.


Directions:

Heat oven to 350 F.
  1. In a medium sized bowl combine: almond flour, tapioca flour, baking powder, cinnamon, nutmeg, sea salt.  Mix in chocolate chips.
  2. In a separate larger bowl, use a hand-mixer to blend: eggs, coconut oil, pumpkin purée, ginger, vanilla, banana and maple syrup until smooth (or as smooth as possible – there may be small pieces of banana which are innocuous).
  3. Add dry ingredients to wet, mixing only until combined.
  4. Pour pumpkin batter into an 8′ x 8′ baking dish that has been lined with parchment paper and gently greased with olive oil.
  5. Bake in the oven for approximately 20-30 minutes or until set and firm to the touch.
  6. Remove from oven, allow to cool for 10 minutes on a rack and then move to fridge for at least one hour to firm up before slicing into squares (toughest part I know ;-). Store squares in fridge.
© Inspired Edibles


pumkin squares

Filed Under: Festive, Snacks and Dessert

Nut-Free Granola Bars! (No Bake, Gluten-Free, Vegan)

September 10, 2013 By kelly / inspired edibles 32 Comments

I’ve had a number of requests for nut-free granola bars to accommodate those with allergies as well as those who wish to enjoy bars in nut-free environments (perfect for school lunch boxes!).

Peanut (legume) and tree nuts (including: walnuts, almonds, hazelnut, cashew, pistachio and Brazil nuts) are among the most common types of allergies in children and adults and can cause severe and life threatening consequences. These allergies are often lifelong.

Sesame seed, though not a tree nut, shares similar proteins and is also a rising allergen.

Both sunflower seeds and pumpkin seeds (pepitas) on other hand, are rare allergens.  They form the basis of today’s bars along with apricot, soft apple, ground flaxseed and oatmeal.  These bars are no-bake, dairy free, egg free and gluten free so I’m hoping that the vast majority of those who suffer from common food allergies can enjoy them.  As an added bonus, they taste remarkably similar to my homemade nut bars (consistently the most popular items at Inspired Edibles ;-) and are loaded with health-building nutrients.

If you’ve not yet tried sunflower seed butter, you’re in for a real treat! Have fun experimenting and enjoy.

Nut-Free Granola Bars (No Bake, Gluten-Free, Vegan)

Nut-Free Granola Bars

  • 2 cups (500 mL) 100% pure, uncontaminated, rolled oats***
  • 1 cup (250 mL) diced dried apples, I used Bob’s Red Mill
  • 10-12 dried apricots, sliced
  • 1/2 cup pepitas (125 mL) (shelled pumpkin seeds)
  • 1/4 cup (62.5 mL) sunflower seeds
  • 1/3 cup (80 mL) ground flaxseed
  • 1 cup (250 mL) sunflower seed butter
  • 1/3 cup (80 mL) pure maple syrup or agave nectar
  • 1/4 cup (62.5 mL) pumpkin purée or apple sauce

Serving: Makes Approximately 14-16 bars + leftover batter for granola bites

Notes:

  1. The key to these bars is to ensure the batter is sticky (not wet) before placing them in the pan.  If the batter is dry and crumbly, you can add a little more pumpkin purée or apple sauce or seed butter until desired consistency (sticky!) is achieved.  If you feel the batter is too wet, incrementally add dry ingredients.
  2. These bars do best when stored in a sealed in a container/bag in the freezer.  Do not leave them out on the counter for an extended period of time.  They never fully freeze so it’s quite convenient to have them in the freezer.
  3. If you are packing these bars up in a lunchbox, I recommend placing an ice pack under them.  They may end up softening but my boys love them that way too – soft and chewy.
  4. If you are making these bars for someone with sulfite sensitivity (asthmatics are often sulfite sensitive) choose unsulfured apricots.
  5. ***Pure oatmeal does not contain gluten however many commercially sold oats do due to cross-contamination issues. If you are gluten sensitive or have celiac disease, be sure to seek out certified ‘gluten-free’ oatmeal.

Directions:

  1. Line an 8″x 8″ (or so) baking pan with parchment or wax paper such that the paper hangs over the edges.
  2. Combine the first 6 ingredients in a large bowl and mix to combine.
  3. Add maple syrup or agave and pumpkin or apple sauce and mix to combine.
  4. Add sunflower butter to mixture and mix until combined.
  5. Place batter in prepared pan pressing down firmly with palm of hands (or mini-roller if you have one) and distributing as evenly as possible.
  6. Allow pan to sit in freezer for approximately 1 hour.
  7. Remove pan from freezer. Lift singular slab from pan by lifting up on paper. Set slab down and gently peel paper away.  Slice slab diagonally into 7 or 8 long bars and then cut each long bar in half to create a total of 14 or 16 bars.  Store sliced bars in sealed container/bag in the freezer.
© Inspired Edibles


Love the colors!

 
Adding in the wet ingredients — sunflower seed butter

is darker than almond and peanut butter

 
Make sure the batter is sticky before pressing down firmly
into the lined pan so that all the ingredients adhere into a singular slab

add a few more colorful pieces of fruit/seed to the top if desired and press down

Take a moment to admire your beautiful and intricate cobblestone pattern ;0)

I think I want this for my kitchen backsplash!


these dried apples are soft, chewy and all natural  

they make a delicious addition to the nut-free bar and help bulk them up


You can roll any extra batter (or the entire batter for that matter)

into balls for granola bites!


Filed Under: Breakfast, Snacks and Dessert

Chocolate Zucchini Pudding Cake (Gluten Free, Dairy Free)

September 4, 2013 By kelly / inspired edibles 18 Comments

I dropped in to a local coffeehouse on Friday just in time to catch the barista serving up an assortment of ‘balance and clarity’ (his words) with complimentary pieces of orange-infused dark chocolate. Delighted patrons mingled arms and exchanged smiles as they politely jockeyed for their share of splendor. I was tempted to push my way through the crowd but I was having too much fun observing. A generous cross-breeze was blowing through the open doors of the historic stone building with the white light of afternoon washing over the interior.

Another lousy day in paradise.

I love experiencing slices of life like that.  Even though afternoon coffee is not generally my thing (I like to reserve my afternoon sip for a cuppa of matcha), I do enjoy a good java and the image and ambiance at Red Rock stayed with me through the weekend.
The cool thing about this recipe – apart from the taste – is its versatility.  You can pack it up in a lunchbox, fancy it up with a dollop of crème fraîche for a dinner party or serve it, as I did here, with a delightful afternoon tea or coffee.

Chocolate Zucchini Pudding Cake (Gluten Free, Dairy Free)

Chocolate Zucchini Pudding Cake 
  • 1 cup (250 mL) zucchini, coarsely grated + more for topping
  • 1 egg
  • 2 tsp (10 mL) pure vanilla extract
  • 3 Tbsp (45 mL) olive oil
  • 3 Tbsp (45 mL) pure maple syrup or honey
  • 1/2 cup (125 mL) apple sauce, I like to use unsweetened
  • 3 ounces quality dark chocolate, chopped into pieces and melted
  • 1/2 scant cup (125 mL) almond flour or ground almonds
  • 1/3 cup (80 mL) tapioca flour (also known as tapioca starch)
  • 1/4 cup (62.5 mL) sliced natural almonds


Makes approximately 6 half cup servings


Directions:

Heat oven to 350 F.

  1. Place grated zucchini in a colander over the sink or a bowl to drain excess water (you can assist in this process by using the back of a spoon or spatula to gently press down on zucchini to release the water or dab with a paper towel).
  2. In a large mixing bowl, combine: egg, vanilla, olive oil, maple syrup or honey, and apple sauce, whisking to combine.
  3. In a separate smaller bowl, combine: almond flour and tapioca flour.
  4. Meanwhile, using a small sturdy pot set to the lowest temperature on the stove, melt the chocolate. This will only take a few minutes but if you raise the heat to accelerate the process, the chocolate will seize and it will ruin the recipe (aka: not worth it). Also take care to prevent liquids/water from contacting the chocolate.
  5. Add grated and drained zucchini to the wet ingredients, mixing to combine.
  6. Add dry ingredients (almond/tapioca) to wet ingredients and drizzle in the melted chocolate (using a spatula to get every last bit!).  Mix all ingredients together just until combined.
  7. Pour the chocolate zucchini mixture into a loaf pan that has been lined with parchment paper that is long enough to hang over both sides (I like to gently coat the paper with olive oil). The parchment paper is not necessary but it prevents sticking and scraping and makes clean up a breeze. The loaf pan dimensions I used were: 9.25 x 5.25 x 2.75 inches.
  8. Sprinkle the center of the loaf with additional zucchini pieces and a sprinkle of sliced almonds.
  9. Place chocolate zucchini loaf in the oven and bake for approximately 45-55 minutes or until the surface layer of the pudding cake has solidified.  The surface should feel solid when you tap on it but there should be some give beneath (the soft pudding layer) a bit like a ripe avocado.
  10. Remove the chocolate zucchini pudding cake from the oven and allow it to cool for 10-15 minutes before spooning out into individual serving bowls/cups.  Top with a few more pieces of zucchini and almonds as desired. You can also serve with a dollop of fresh cream if you wish.
© Inspired Edibles


You will end up with a dark chewy exterior layer
and a soft, lighter-colored, molten interior


your pudding cake will have darker chewy pieces from the exterior
combined with a soft lighter-colored pudding beneath

Filed Under: Snacks and Dessert

Healthy Lunch Series: Quinoa Zucchini Bake ~ served warm or cold (Gluten Free, Vegetarian)

July 9, 2013 By kelly / inspired edibles 20 Comments

healthy lunch series - quinoa zucchini bake_blog

As part of Inspired Edibles’ ongoing Healthy Lunch Series, I’m excited to share this seasonal zucchini and quinoa bake that you can serve up warm and comforting from the oven or cool and refreshing from the fridge.

Many of us are experiencing mercurial weather this summer — cold and rainy one day, uncomfortably humid the next.  This simple, nutritious meal will accommodate either end of the spectrum nicely.

Made ahead, these cooled squares pack up beautifully into lunch boxes and picnic baskets and you can easily vary the contents and flavor accents with different fruit, vegetables, herbs and spices as desired (see suggestions in the Cooking & Nutrition Notes section below).

I hope you have fun with it and enjoy adding the recipe to your lunch repertoire!

Healthy Lunch Series: Quinoa Zucchini Bake

Quinoa Zucchini Bake ~ served warm or cold (Gluten Free, Vegetarian)

  • 2 cups (500 mL) cooked quinoa
  • 2 cups (500 mL) packed and drained shredded zucchini (I used a combination of yellow and green zucchini)
  • 3 green onions (scallions), sliced thin
  • 1/2 cup (125 mL) mushroom pieces
  • 1/3 cup (80 mL) shredded Parmesan
  • 1 Tbsp (15 mL)  lemon zest
  • 2 heaping Tbsp (30 mL) fresh dill
  • Sea salt & coarse pepper seasoning
  • 1/2 cup (125 mL) plain Greek yogurt
  • 2 Tbsp (30 mL) olive oil 
  • 4 eggs


Makes 12 Squares

Cooking & Nutrition Notes:

  • Variety is the spice of life and in this case, there are many gorgeous combinations you can play around with.  I worked with mushroom, Parmesan, lemon and fresh dill but consider some of these variations: chopped apple and nutmeg; tomato and fresh basil; garlic, walnut and parsley; crunchy anise and tarragon; chopped pear and sage; blueberry and mint; cheddar, corn and chili pepper. 
  • Dubbed the “mother grain” by the Incas, quinoa’s nutrient profile has earned it star status. Rich in plant protein, quinoa contains all nine essential amino acids making it an important staple for vegetarian/vegan diets. It also contains B vitamins and a number of minerals including, notably: magnesium (a natural muscle relaxant), manganese, phosphorus, copper and iron. Quinoa’s low glycemic index also makes it a good choice for blood glucose control in diabetics (and those wishing to prevent the onset of type 2 diabetes).
  • If you are making this recipe for youngsters, you can cut the quinoa zucchini bake into fun and interesting shapes — squares, circles, long stick shapes, triangles, any cookie cutter shape you have on hand etc.  You can also provide dipping sauces – tzatziki would work beautifully here – but any bean dip as well.  (Or, as one of my sons might advise, hot buffalo wing sauce!)

Directions:

Heat oven to 350 F.  

  1. Cook quinoa according to package directions (generally 1:2 ratio quinoa to water) and allow it to cool somewhat.  Quinoa increases about 4 times in volume when cooked. A 1/2 cup of dry quinoa should generate about 2 cups of cooked quinoa. Use 1 cup of dry to be safe and store any leftovers in a sealed container in the fridge.
  2. Meanwhile, place shredded zucchini in a colander set over a bowl or sink.  Press down on the zucchini to squeeze out excess moisture.
  3. Place cooked quinoa, shredded and drained zucchini, green onions, mushrooms, Parmesan, lemon zest, dill, salt & pepper in a large bowl and mix to combine.
  4. In a separate smaller bowl, whisk together yogurt, olive oil and eggs.  
  5. Add wet ingredients to dry mixing only until combined.
  6. Line a baking pan (roughly 6 1/2 x 10) with parchment paper such that the paper hangs over the sides of the pan. Pour quinoa zucchini batter into the pan.  Add a final sprinkling of cheese and mushrooms to the surface.
  7. Place pan in oven and bake for approximately 35 minutes or until set (slightly golden and just firm to touch).
  8. Remove pan from oven allow it to cool.  Elevate the quinoa zucchini bake slab from the pan by pulling up on parchment (if you can) or with the help of a large spatula and slice slab into squares or desired shape.
© Inspired Edibles


I must have eaten a pound of heirloom carrots with malt & salt
while making this recipe…
Ready for the oven
so simple and packed with goodness
perfect picnic food
you just know I want to break into Seals & Crofts right now

healthy lunch series - quinoa zucchini bake_blog

Filed Under: Appetizers and Starters, Main Dish, Snacks and Dessert

Homemade Orange Creamsicle Popsicles ~ All Natural, Vegan

July 2, 2013 By kelly / inspired edibles 34 Comments

vegan orange creamsicle_inspired edibles
Well, I have to agree with my son on this one.  These may be the tastiest popsicles I’ve made to date. 

He didn’t quite put it that way though. 

In fact, he said it precisely like this: “Wow, Mom, these actually taste like popsicles.”  In teenage parlance I knew exactly what he meant.  I finally managed to create an all natural popsicle that wasn’t rock hard and entirely devoid of flavor.

This is the same teenage son who, upon sampling one of my first versions of low sugar cookies, chose to break it to me gently this way: “Oh Mom, you don’t know what you’re up against.”

He said it with such a calm assuredness and sincerity that it had me laughing tears. We both knew he was right of course and he managed to synthesize the battle of the century into one simple sentence.  (He can be infuriatingly smart that way).

 I still find myself laughing about his comment at the strangest times – in the middle of the night, driving my car, brushing my teeth.  It reminds me of all the times I almost certainly embarrassed my boys in their younger years by insisting on real food and refusing to buckle under pressure.  Handing out apple baskets instead of loot bags at their birthday parties, making fresh fruit birthday cakes, sending them off with veggie platters to school parties and the coup de grace, introducing a healthy lunch program at their elementary school (let’s just say it didn’t have the same momentum as pizza day).  Yup, moms can be downright distressing at times. Ah well, better to stand for something, right?  Besides, it builds character and there are plenty of those around here.


Homemade Orange Creamsicle Popsicles

Homemade Orange Creamsicle Popsicles ~ All Natural, Vegan
  • 1 cup (250 mL) fresh squeezed orange juice (or any quality mixed orange juice)
  • 1 cup (250 mL) coconut milk
  • 3 Tbsp (45 mL) pure maple syrup
  • 1 Tbsp (15 mL) fresh lime juice
  • 1 Tbsp (15 mL) orange zest (I also like adding small chunks of fresh orange pulp)
  • 1 tsp (5 mL) pure vanilla extract

Makes approximately 4 half cup (125 mL) popsicles

Notes:
  • The combination of orange and coconut is positively swoon-worthy. The lime adds a note of tartness while the zest/pulp emphasize the delicious and refreshing orange.
  • I used coconut milk here not only because it’s a dairy free alternative that happens to taste delicious but also for its health properties. Although most of the fat in coconut milk is saturated fat, this plant based saturated fat is made up of a unique blend of medium-chain fatty acids (most fats in our diet are long-chain fatty acids) which appear to have a positive effect on cholesterol levels, notably raising HDL (good) cholesterol.  These same medium-chain fats also appear to increase calorie burning in the body through their action of direct delivery to the liver for energy.

vegan orange creamsicle_3_Inspired Edibles

Directions:
1.     Simply mix ingredients together, by hand or in a blender/food processor, and pour into individual popsicles molds. 
2.     Add a popsicle stick in the center of the mold and place in freezer for approximately 3 hours.
3.     Remove popsicles from freezer 5 or 10 minutes before serving.  Run exterior of popsicle molds under hot water for a few seconds and then gently pull on popsicle stick to release popsicle from mold.
© Inspired Edibles

vegan orange creamsicle_1_Inspired Edibles
Fill an ice cube tray (or two) with any remaining popsicle mixture
and enjoy orange-coconut infused water for days ~
vegan orange creamsicle_2_Inspired Edibles
A Brilliant Happy Hour by the Lake
Celebrating 10 years of Cottage Living & 17 Years of Marriage!
(my prince charming taking the photo)

kelly water

  our bathing beauty and constant companion
dogga cottage

Filed Under: Snacks and Dessert

  • « Previous Page
  • 1
  • …
  • 5
  • 6
  • 7
  • 8
  • 9
  • …
  • 13
  • Next Page »

Search

Subscribe to Inspired Edibles via Email

Say Hello!

  • Facebook
  • LinkedIn
  • Pinterest
  • Twitter
Visit Kelly Mulcair / Inspired Edibles's profile on Pinterest.

Recent Posts

  • New Moon Intentions

    New Moon Intentions

    April 26, 2025
  • Sleep Solutions for Sensitive Souls (Full Moon Edition!)

    Sleep Solutions for Sensitive Souls (Full Moon Edition!)

    April 10, 2025
  • Elderflower Mocktail

    Elderflower Mocktail

    March 13, 2025
  • Winter Citrus Salad with Shaved Fennel & Castelvetrano Olives

    Winter Citrus Salad with Shaved Fennel & Castelvetrano Olives

    January 25, 2025
  • Winter Flourish Bowl

    Winter Flourish Bowl

    January 4, 2025

Copyright © 2025 Inspired Edibles, All Rights Reserved